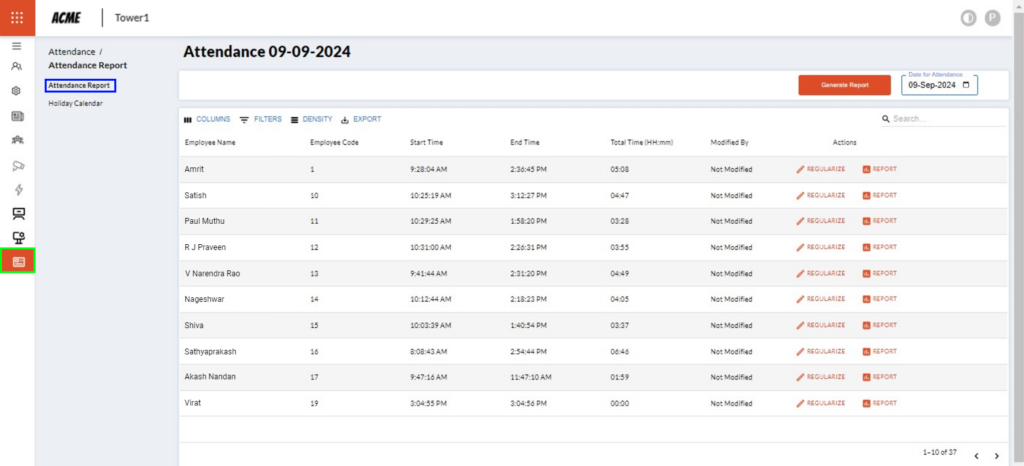
A Facility Manager or an Admin can access ‘Attendance‘ from the dashboard. It can be accessed by clicking on the 9 dots on the top left corner of the screen in the header section and then clicking on the ‘Admin Console’ button. The ‘Attendance’ button (marked in green) is at the bottom of the menu. Refer to the image below.

After clicking the ‘Attendance’ button, you will land on the ‘Attendance Report’ (marked in blue) page. This page will provide you with the following details:
1. Employee Name: Displays the names of the employees
2. Employee Code: Displays the employee’s code
3. Start Time: Displays the time when the employee logs in his/her time
4. End Time: Displays the time when the employee has logged out of the system
5. Total Time (HH:mm): Displays the total number of hours and minutes the employee has worked
6. Modified By: Displays the name of the person who has modified that particular day’s attendance
7. Actions: Consists of two buttons ‘Regularise’ and ‘Report’
a. Regularise: This option has been given to rectify any issues w.r.t. timings. Click on the pencil icon to edit the check-in and check-out timings. Also, enter the reason for the change and submit.
b. Report: You can download the report of an individual for a particular day or a particular period by clicking on this button
8. Generate Report: You can download the report of all the employees for a particular day or a particular period by clicking on this button
9. Date for Attendance: Select the date that will provide the details of individuals present on that particular date
10. Search is also provided to find the information easily
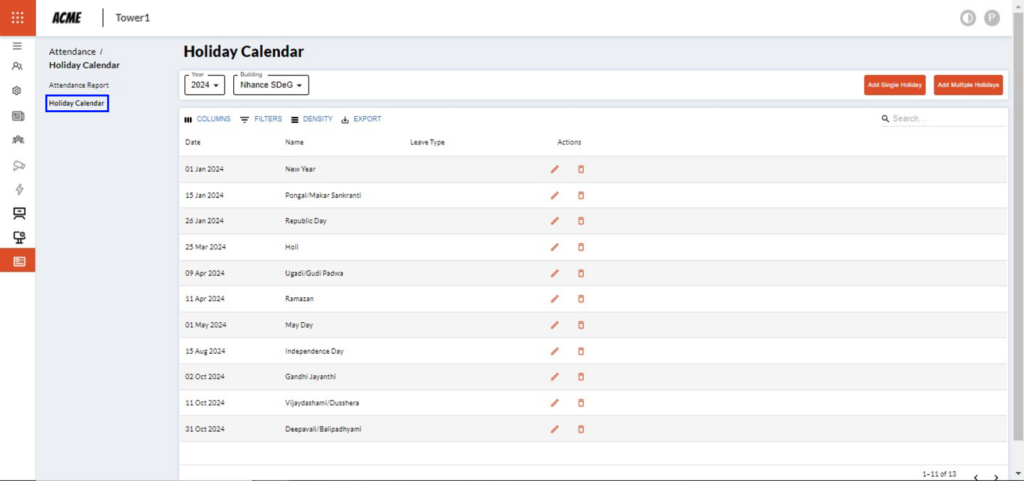
After clicking the ‘Holiday Calendar’ button, you will land on the ‘Holiday Calendar‘ (marked in blue) page. See the image below.

This page will provide you with the following details:
1. Year dropdown: The dropdown allows you to select the relevant year so that you can see the holiday details of that particular year
2. Building dropdown: The dropdown allows you to select the relevant building from the given options
3. Date: Displays the date and month for that particular year
4. Name: Displays the name of the holiday
5. Leave Type: Displays whether the holiday is National or Regional
6. Actions: Allows you to edit or delete a particular holiday
a. Edit: Click on the pencil icon to edit a particular holiday. You can edit the Building name, Date, Holiday Name, and Type of the holiday.
b. Delete button: Allows you to delete a holiday
7. Add Single Holiday button: Allows you to add a one-holiday entry only. You can select the Building name from the given list in the dropdown, add the Date and holiday Name, and select the Type of the holiday from the dropdown.
8. Add Multiple Holidays: This allows you to add multiple holidays in one go. When clicked on the button you will be presented with a pop-up with options of ‘Download Template’ and ‘Upload Excel’. The ‘Download Template’ allows you to download the Excel file template, after you enter the contents click on the ‘Upload Excel’ button and upload the file by clicking on the ‘Submit’ button and refresh the page to see the updated list of holidays.
9. Search is also provided to find the information easily